OpenDKIM インストール。
~]# dnf --enablerepo=epel install opendkim opendkim-tools
/etc/opendkim/keys/ にキーペア(秘密鍵/公開鍵)の情報ファイルを作成。
~]# opendkim-genkey -D /etc/opendkim/keys/ -d wave440.com
ファイルの所有権を設定。
~]# chown opendkim:opendkim /etc/opendkim -R
公開鍵情報ファイルの内容を確認。
~]# cat /etc/opendkim/keys/default.txt
default._domainkey IN TXT ( "v=DKIM1; k=rsa; "
"p=公開鍵データ" ) ; ----- DKIM key default for wave440.com
DNSサーバ(外部向け正引きゾーンデータベース)に DKIM で利用する2つのレコード(公開鍵レコードと ADSP レコード)及び DMARC レコードを登録。
~]# vi /var/named/wave440.com.db.wan
最終行へ追加(公開鍵レコードは、上記 default.txt の内容をそのままコピペで O.K.)。
なお、外部向け正引きゾーンデータベースファイルの Serial 値も更新する。
default._domainkey IN TXT ( "v=DKIM1; k=rsa; "
"p=公開鍵データ" ) ; ----- DKIM key default for wave440.com
_adsp._domainkey.wave440.com. IN TXT "dkim=unkown"
_dmarc.wave440.com. IN TXT "v=DMARC1; p=none; rua=mailto:dmarc-rua@wave440.com"
DMARC ポリシー設定
p=<none|quarantine|reject>
ポリシーの比較
| ポリシー |
意味 |
用途の目安 |
| none |
何もしない(監視のみ) |
導入・調査フェーズ |
| quarantine |
迷惑メール扱い(隔離) |
問題が少ないと確認できた段階 |
| reject |
受信拒否 |
運用が安定し、なりすましを厳格に防ぎたい時 |
設定反映。
~]# rndc reload wave440.com
postfix を opendkim グループに所属させる。
~]# usermod -a -G opendkim postfix
opendkim.conf の設定。
~]# vi /etc/opendkim.conf
変更と削除。
・・・
・・・
## Selects operating modes. Valid modes are s (sign) and v (verify). Default is v.
## Must be changed to s (sign only) or sv (sign and verify) in order to sign outgoing
## messages.
Mode v
↓↓↓
Mode sv
・・・
・・・
## Create a socket through which your MTA can communicate.
#Socket inet:8891@localhost
Socket local:/run/opendkim/opendkim.sock
・・・
・・・
## Add a DKIM-Filter header field to messages passing through this filter
## to identify messages it has processed.
SoftwareHeader yes
↓↓↓
SoftwareHeader no
・・・
・・・
## Domain(s) whose mail should be signed by this filter. Mail from other domains will
## be verified rather than being signed. Uncomment and use your domain name.
## This parameter is not required if a SigningTable is in use.
# Domain example.com
↓↓↓
Domain wave440.com
・・・
・・・
## Identifies a set of "external" hosts that may send mail through the server as one
## of the signing domains without credentials as such.
# ExternalIgnoreList refile:/etc/opendkim/TrustedHosts
## Identifies a set "internal" hosts whose mail should be signed rather than verified.
# InternalHosts refile:/etc/opendkim/TrustedHosts
・・・
・・・
TrustedHosts ファイル確認。
~]# cat /etc/opendkim/TrustedHosts
# OPENDKIM TRUSTED HOSTS
# To use this file, uncomment the #ExternalIgnoreList and/or the #InternalHosts
# option in /etc/opendkim.conf then restart OpenDKIM. Additional hosts
# may be added on separate lines (IP addresses, hostnames, or CIDR ranges).
# The localhost IP (127.0.0.1) should always be the first entry in this file.
127.0.0.1
::1
#host.example.com
#192.168.1.0/24
OpenDKIM の起動と自動起動設定。
~]# systemctl enable --now opendkim
SMTP接続時にDKIMと連携するパラメータ設定を追記。
~]# vi /etc/postfix/main.cf
最終行へ追加。
# DKIM連携の設定
smtpd_milters = unix:/run/opendkim/opendkim.sock
non_smtpd_milters = unix:/run/opendkim/opendkim.sock
milter_default_action = accept
Postfix 再起動。
~]# systemctl restart postfix
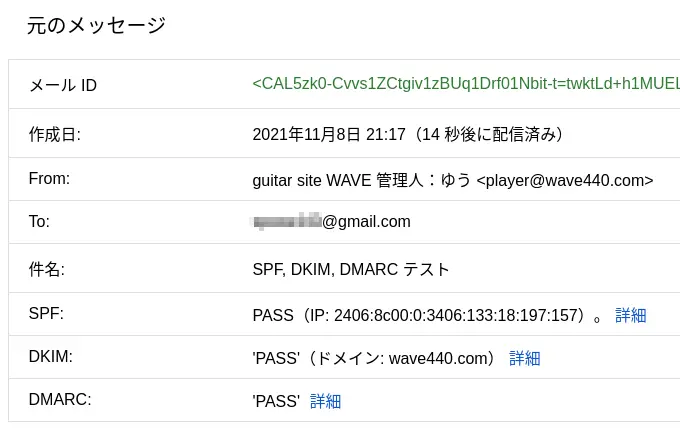
確認のため Gmail 等にメール送信してみる。
Gmail の例(メッセージのソースを表示)。
↓↓↓
php-mysqlnd も一緒にインストールしています。
~]# dnf -y install mariadb-server php-mysqlnd
MariaDB 設定ファイル編集。
追加。
~]# vi /etc/my.cnf.d/mariadb-server.cnf
# This group is only read by MariaDB-10.11 servers.
# If you use the same .cnf file for MariaDB of different versions,
# use this group for options that older servers don't understand
[mariadb-10.11]
character-set-server = utf8mb4
~]# vi /etc/my.cnf.d/client.cnf
# This group is not read by mysql client library,
# If you use the same .cnf file for MySQL and MariaDB,
# use it for MariaDB-only client options
[client-mariadb]
default-character-set = utf8mb4
自動起動有効+起動。
~]# systemctl enable --now mariadb
MariaDB 初期設定。
~]# mysql_secure_installation
入力。
NOTE: RUNNING ALL PARTS OF THIS SCRIPT IS RECOMMENDED FOR ALL MariaDB
SERVERS IN PRODUCTION USE! PLEASE READ EACH STEP CAREFULLY!
In order to log into MariaDB to secure it, we'll need the current
password for the root user. If you've just installed MariaDB, and
haven't set the root password yet, you should just press enter here.
Enter current password for root (enter for none): ⏎
OK, successfully used password, moving on...
Setting the root password or using the unix_socket ensures that nobody
can log into the MariaDB root user without the proper authorisation.
You already have your root account protected, so you can safely answer 'n'.
Switch to unix_socket authentication [Y/n] n
... skipping.
You already have your root account protected, so you can safely answer 'n'.
Change the root password? [Y/n] n
... skipping.
By default, a MariaDB installation has an anonymous user, allowing anyone
to log into MariaDB without having to have a user account created for
them. This is intended only for testing, and to make the installation
go a bit smoother. You should remove them before moving into a
production environment.
Remove anonymous users? [Y/n] ⏎
... Success!
Normally, root should only be allowed to connect from 'localhost'. This
ensures that someone cannot guess at the root password from the network.
Disallow root login remotely? [Y/n] ⏎
... Success!
By default, MariaDB comes with a database named 'test' that anyone can
access. This is also intended only for testing, and should be removed
before moving into a production environment.
Remove test database and access to it? [Y/n] ⏎
- Dropping test database...
... Success!
- Removing privileges on test database...
... Success!
Reloading the privilege tables will ensure that all changes made so far
will take effect immediately.
Reload privilege tables now? [Y/n] ⏎
... Success!
Cleaning up...
All done! If you've completed all of the above steps, your MariaDB
installation should now be secure.
Thanks for using MariaDB!
MariaDB へ root でログイン。(パスワード不要)
~]# mysql
【以降の作業について。】
① root で DB を作る(管理者作業)
MariaDB [(none)]> CREATE DATABASE app_db;
② root でユーザーを作る(管理者作業)
MariaDB [(none)]> CREATE USER 'app_user'@'localhost' IDENTIFIED BY 'password';
③ 必要最小限の権限だけ与える
MariaDB [(none)]> GRANT SELECT, UPDATE, DELETE ON app_db.* TO 'app_user'@'localhost';
④ アプリはそのユーザーで DB に接続する
下記は root だけがやればよい。
DB 作成
テーブル作成
ユーザー作成
権限管理
バックアップ
リストア
GRANT と REVOKE
GRANT は 上書きではなく追加
権限を減らしたいときは REVOKE が必須
app_user から UPDATE だけ削除したい場合:
REVOKE UPDATE ON app_db.* FROM 'app_user'@'localhost';
付与可能なすべての権限を追加する
GRANT ALL PRIVILEGES ON db.* TO 'user'@'host';
そのユーザーが持っている権限をすべて削除する
REVOKE ALL PRIVILEGES ON db.* FROM 'user'@'host';
app_user の権限を確認する
SHOW GRANTS FOR 'app_user'@'localhost';
データのバックアップ及びリストア
~]# mysqldump auth_db > auth_db.sql
~]# mysql auth_db < auth_db.sql
データベース一覧を表示する
MariaDB [(none)]> SHOW DATABASES;
ユーザー一覧を表示する
MariaDB [(none)]> SELECT User, Host FROM mysql.user;
全ユーザーの権限をまとめて標準出力
~]# mysql -N -e "SELECT CONCAT('SHOW GRANTS FOR ''',User,'''@''',Host,''';') FROM mysql.user" \
| mysql
rclone インストール。
~]# curl https://rclone.org/install.sh | bash
・・・
・・・
rclone v1.74.3 has successfully installed.
Now run "rclone config" for setup. Check https://rclone.org/docs/ for more details.
ローカルの PC で rclone コマンドを使用するため、ローカルの PC にも rclone のインストールが必要。
local:~$ sudo -v ; curl https://rclone.org/install.sh | sudo bash
リモート設定を登録。入力,コメント。
client_id,client_secret は、作成せずに空エンターでも可ですが、パフォーマンスが落ちるとのこと。
作成するのであれば、ご参考まで。→ rclone 用に独自の Google Drive クライアント ID を作成する。
~]# rclone config
2026/06/06 12:05:13 NOTICE: Config file "/root/.config/rclone/rclone.conf" not found - using defaults
No remotes found, make a new one?
n) New remote
s) Set configuration password
q) Quit config
n/s/q> n
Enter name for new remote.
name> google-backup ← 任意のリモート設定名
Option Storage.
Type of storage to configure.
Choose a number from below, or type in your own value.
1 / 1Fichier
\ (fichier)
2 / Akamai NetStorage
\ (netstorage)
3 / Alias for an existing remote
\ (alias)
・・・
・・・
23 / Google Cloud Storage (this is not Google Drive)
\ (google cloud storage)
24 / Google Drive
\ (drive)
25 / Google Photos
\ (google photos)
・・・
・・・
66 / iCloud Drive and Photos
\ (iclouddrive)
67 / premiumize.me
\ (premiumizeme)
68 / seafile
\ (seafile)
Storage> drive
Option client_id.
Google Application Client Id
Setting your own is recommended.
See https://rclone.org/drive/#making-your-own-client-id for how to create your own.
If you leave this blank, it will use an internal key which is low performance.
Enter a value. Press Enter to leave empty.
client_id> ⏎ ← 作成していればクライアント ID を入力
Option client_secret.
OAuth Client Secret.
Leave blank normally.
Enter a value. Press Enter to leave empty.
client_secret> ⏎ ← 作成していればクライアント シークレットを入力
Option scope.
Comma separated list of scopes that rclone should use when requesting access from drive.
Choose a number from below, or type in your own value.
Press Enter to leave empty.
1 / Full access all files, excluding Application Data Folder.
\ (drive)
2 / Read-only access to file metadata and file contents.
\ (drive.readonly)
/ Access to files created by rclone only.
3 | These are visible in the drive website.
| File authorization is revoked when the user deauthorizes the app.
\ (drive.file)
/ Allows read and write access to the Application Data folder.
4 | This is not visible in the drive website.
\ (drive.appfolder)
/ Allows read-only access to file metadata but
5 | does not allow any access to read or download file content.
\ (drive.metadata.readonly)
scope> 1
Option service_account_file.
Service Account Credentials JSON file path.
Leave blank normally.
Needed only if you want use SA instead of interactive login.
Leading `~` will be expanded in the file name as will environment variables such as `${RCLONE_CONFIG_DIR}`.
Enter a value. Press Enter to leave empty.
service_account_file> ⏎
Edit advanced config?
y) Yes
n) No (default)
y/n> n
Use web browser to automatically authenticate rclone with remote?
* Say Y if the machine running rclone has a web browser you can use
* Say N if running rclone on a (remote) machine without web browser access
If not sure try Y. If Y failed, try N.
y) Yes (default)
n) No
y/n> n
Option config_token.
For this to work, you will need rclone available on a machine that has
a web browser available.
For more help and alternate methods see: https://rclone.org/remote_setup/
Execute the following on the machine with the web browser (same rclone
version recommended):
rclone authorize "drive" "eyJjbxxxxx" ← ※1
Then paste the result.
Enter a value.
config_token> ← ※2
Configure this as a Shared Drive (Team Drive)?
y) Yes
n) No (default)
y/n> n
Configuration complete.
Options:
- type: drive
- scope: drive
- token: {"access_token":"ya29.xxxxx","expiry":"2026-06-06T13:16:10.992982584+09:00","expires_in":3599}
- team_drive:
Keep this "google-backup" remote?
y) Yes this is OK (default)
e) Edit this remote
d) Delete this remote
y/e/d> y
Current remotes:
Name Type
==== ====
google-backup drive
e) Edit existing remote
n) New remote
d) Delete remote
r) Rename remote
c) Copy remote
s) Set configuration password
q) Quit config
e/n/d/r/c/s/q> q
※1 ローカルの PC でココのコマンドを実行する。
local:~$ rclone authorize "drive" "eyJjbxxxxx"
・・・
・・・
ブラウザが立ち上がり Google のログイン画面となるので、ログイン。続行。
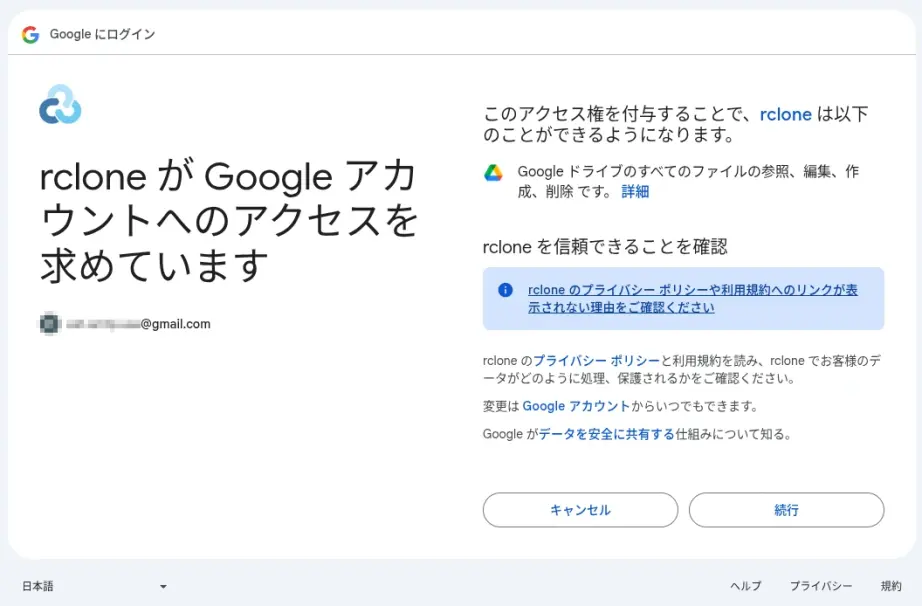
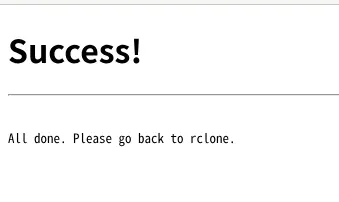
最終的には「Success!」と表示されて、端末上には以下のようにトークンが表示されているので、それを※2にコピペ。
・・・
・・・
Paste the following into your remote machine --->
eyJ0bxxxxx
<---End paste
【Rclone 基本操作】
BACKUP ディレクトリを作成。
~]# rclone mkdir google-backup:/BACKUP
確認。
~]# rclone lsd google-backup:
-1 2020-11-28 12:55:06 -1 BACKUP
コピーしてバックアップをとる。
(-P/--progress:リアルタイムの転送統計を表示する)
~]# rclone copy /path/to/dir/website.tar google-backup:/BACKUP/ -P
Transferred: 2.407M / 2.407 MBytes, 100%, 264.357 kBytes/s, ETA 0s
Transferred: 1 / 1, 100%
Elapsed time: 9.9s
確認。
~]# rclone ls google-backup:/BACKUP/
2524097 website.tar
新サーバーの DNS へ切り替えたのち、hook 付き certbot を実行して、renewal 設定を作成する。
1. TSIG 鍵の作成。
~]# tsig-keygen -a hmac-sha256 certbot-key > /var/named/certbot.key
~]# chown root:named /var/named/certbot.key
~]# chmod 640 /var/named/certbot.key
2. named.conf に TSIG 鍵を登録。
~]# vi /etc/named.conf
追記。
include "/var/named/certbot.key";
zone "wave440.com" {
type master;
file "wave440.com.db.wan";
update-policy {
grant certbot-key name _acme-challenge.wave440.com. txt;
};
allow-query { any; };
allow-transfer {
216.218.133.2;
2001:470:600::2;
};
notify yes;
};
設定反映。
~]# rndc reconfig
3. Certbot hook スクリプトを作成。
manual-auth-hook(TXT 追加)
~]# vi /usr/local/bin/certbot-auth.sh
#!/bin/bash
nsupdate -k /var/named/certbot.key << EOF
server 127.0.0.1
zone wave440.com.
update add _acme-challenge.wave440.com. 60 IN TXT "$CERTBOT_VALIDATION"
send
EOF
manual-cleanup-hook(TXT 削除)
~]# vi /usr/local/bin/certbot-cleanup.sh
#!/bin/bash
nsupdate -k /var/named/certbot.key << EOF
server 127.0.0.1
zone wave440.com.
update delete _acme-challenge.wave440.com. TXT
send
EOF
deploy-hook(更新後に httpd / Postfix / Dovecot を reload)
~]# vi /usr/local/bin/certbot-deploy.sh
#!/bin/bash
systemctl reload httpd
systemctl reload postfix
systemctl reload dovecot
権限。
chmod 700 /usr/local/bin/certbot-*.sh
4. 新サーバーの DNS で取得(DNS‑01 manual)
入力
~]# certbot certonly \
--manual \
--preferred-challenges dns \
--manual-auth-hook /usr/local/bin/certbot-auth.sh \
--manual-cleanup-hook /usr/local/bin/certbot-cleanup.sh \
--deploy-hook /usr/local/bin/certbot-deploy.sh \
-d '*.wave440.com' -d wave440.com \
--agree-tos \
--email xxxxx@wave440.com
・・・
・・・
What would you like to do?
- - - - - - - - - - - - - - - - - - - - - - - - - - - - - - - - - - - - - - - -
1: Keep the existing certificate for now
2: Renew & replace the certificate (may be subject to CA rate limits)
- - - - - - - - - - - - - - - - - - - - - - - - - - - - - - - - - - - - - - - -
Select the appropriate number [1-2] then [enter] (press 'c' to cancel): 2
Renewing an existing certificate for *.wave440.com and wave440.com
Successfully received certificate.
Certificate is saved at: /etc/letsencrypt/live/wave440.com/fullchain.pem
Key is saved at: /etc/letsencrypt/live/wave440.com/privkey.pem
・・・
・・・
systemd タイマー確認。
~]# systemctl list-timers
renewal 設定確認。
~]# cat /etc/letsencrypt/renewal/wave440.com.conf
deploy-hook 付きで実行しても、renewal 設定には renew_hook として保存されるようです。
renew_hook は古い互換用らしいので、手動で deploy_hook に変更編集しました。
rndc reload example.com
rndc: 'reload' failed: dynamic zone
このエラーは、ゾーンが allow-update または update-policy により動的更新(nsupdate)を許可しているため、手動編集 + reload が禁止されるという意味です。
動的ゾーンを一時的にフリーズ して編集 → thaw
rndc freeze example.com
vi /var/named/example.com.zone
rndc thaw example.com
--enablerepo を付けてインストールしたパッケージは、自動更新の dnf update では update されないので、--enablerepo を付けて更新するスクリプトを作成して、/etc/cron.weekly/ に置いています。
#!/bin/bash
dnf -y update --enablerepo=epel nkf ImageMagick ImageMagick-devel ffmpeg ffmpeg-devel snapd opendkim opendkim-tools vnstat
dnf -y update --enablerepo=crb libwebp-tools
/var/named/ 内に tmp-xxxxx という消えるべき一時ファイルが大量に蓄積されていくので、下記スクリプトを作成して、/etc/cron.daily/ に置いています。
1日前(24時間以上前)に作成・更新された tmp-* ファイルを削除します。
時間を指定しているのは、BIND がまさに今使っているかもしれないものを除外するためです。
#!/bin/bash
find /var/named/ -maxdepth 1 -name "tmp-*" -mtime +0 -type f -delete