perl-CPAN をインストール。
~]# dnf install perl-CPAN
入力。
~]# perl -MCPAN -e shell
CPAN.pm requires configuration, but most of it can be done automatically.
If you answer 'no' below, you will enter an interactive dialog for each
configuration option instead.
Would you like to configure as much as possible automatically? [yes] yes
Perl site library directory "/usr/local/share/perl5/5.40" does not exist.
Perl site library directory "/usr/local/share/perl5/5.40" created.
Perl site library directory "/usr/local/lib64/perl5/5.40" does not exist.
Perl site library directory "/usr/local/lib64/perl5/5.40" created.
We initialized your 'urllist' to https://cpan.org/. Type 'o conf init urllist' to change it.
Autoconfiguration complete.
commit: wrote '/root/.cpan/CPAN/MyConfig.pm'
You can re-run configuration any time with 'o conf init' in the CPAN shell
Terminal does not support AddHistory.
To fix that, maybe try> install Term::ReadLine::Perl
cpan shell -- CPAN exploration and modules installation (v2.36)
Enter 'h' for help.
cpan[1]> install MIME::Base64
cpan[2]> install CGI
cpan[3]> install Jcode
cpan[4]> quit
外部向け正引きのみの 権威 DNS サーバです。
逆引きはコントロールパネルで行っています。参考:逆引き設定
bind, bind-chroot インストール。
~]# dnf -y install bind bind-chroot bind-utils
BIND 設定ファイル編集。
~]# vi /etc/named.conf
変更と追加。
options {
#listen-on port 53 { 127.0.0.1; };
#listen-on-v6 port 53 { ::1; };
version "unknown";
directory "/var/named";
dump-file "/var/named/data/cache_dump.db";
statistics-file "/var/named/data/named_stats.txt";
memstatistics-file "/var/named/data/named_mem_stats.txt";
allow-transfer { none; };
・・・
・・・
recursion yes;
↓↓↓
recursion no;
・・・
・・・
logging {
channel default_debug {
file "data/named.run";
severity dynamic;
};
category lame-servers { null; };
};
・・・
・・・
以下を最終行へ追加。
「216.218.133.2」と「2001:470:600::2」はセカンダリネームサーバ(Hurricane Electric Free DNS)の IP アドレスです。
zone "wave440.com" {
type master;
file "wave440.com.db.wan";
allow-query { any; };
allow-transfer {
216.218.133.2;
2001:470:600::2;
};
notify yes;
};
※ Hurricane Electric Free DNS:サーバのIPアドレスが変わったら、旧アドレスの登録を削除して、新しく作成しなおすみたいです。自動で変わらなかったので。「Add a new slave」から → 登録画面。
外部向け正引きゾーンデータベース作成。
「ns1.he.net」~「ns5.he.net」はセカンダリネームサーバ(Hurricane Electric Free DNS)です。
~]# vi /var/named/wave440.com.db.wan
$TTL 86400
@ IN SOA ns1.wave440.com. root.wave440.com.(
2021110201 ; Serial
7200 ; Refresh
7200 ; Retry
2419200 ; Expire
86400 ) ; Minimum
IN NS ns1.wave440.com.
IN NS ns1.he.net.
IN NS ns2.he.net.
IN NS ns3.he.net.
IN NS ns4.he.net.
IN NS ns5.he.net.
IN MX 10 wave440.com.
ns1 IN A 133.xxx.xxx.xxx
IN AAAA 2406:xxxx:xxxx:xxxx:133:xxxx:xxxx:xxxx
@ IN A 133.xxx.xxx.xxx
IN AAAA 2406:xxxx:xxxx:xxxx:133:xxxx:xxxx:xxxx
www IN A 133.xxx.xxx.xxx
IN AAAA 2406:xxxx:xxxx:xxxx:133:xxxx:xxxx:xxxx
mail IN A 133.xxx.xxx.xxx
IN AAAA 2406:xxxx:xxxx:xxxx:133:xxxx:xxxx:xxxx
server IN A 133.xxx.xxx.xxx
IN AAAA 2406:xxxx:xxxx:xxxx:133:xxxx:xxxx:xxxx
wave440.com. IN TXT "v=spf1 mx ~all"
named-chroot 自動起動有効+起動。
~]# systemctl enable --now named-chroot
ポート開放。
~]# firewall-cmd --add-service=dns --zone=public --permanent
~]# firewall-cmd --reload
Apache と PHP 及び PHP 関連パッケージをインストール。
~]# dnf -y install httpd php php-mbstring php-gd php-json php-xml php-zip
インストールされたモジュールの一覧を確認するなら。
~]# php -m
Apache 設定ファイル編集。
~]# vi /etc/httpd/conf/httpd.conf
変更と追加と削除。
ServerAdmin root@localhost
↓↓↓
ServerAdmin webmaster@wave440.com
・・・
・・・
#ServerName www.example.com:80
↓↓↓
ServerName www.wave440.com:80
・・・
・・・
<Directory "/var/www/html">
#
# Possible values for the Options directive are "None", "All",
# or any combination of:
# Indexes Includes FollowSymLinks SymLinksifOwnerMatch ExecCGI MultiViews
#
# Note that "MultiViews" must be named *explicitly* --- "Options All"
# doesn't give it to you.
#
# The Options directive is both complicated and important. Please see
# http://httpd.apache.org/docs/2.4/mod/core.html#options
# for more information.
#
Options Indexes FollowSymLinks
↓↓↓
Options Includes ExecCGI FollowSymLinks
#
# AllowOverride controls what directives may be placed in .htaccess files.
# It can be "All", "None", or any combination of the keywords:
# Options FileInfo AuthConfig Limit
#
AllowOverride None
↓↓↓
AllowOverride All
#
# Controls who can get stuff from this server.
#
Require all granted
</Directory>
・・・
・・・
<IfModule log_config_module>
#
# The following directives define some format nicknames for use with
# a CustomLog directive (see below).
#
LogFormat "%h %l %u %t \"%r\" %>s %b \"%{Referer}i\" \"%{User-Agent}i\"" combined
↓↓↓
LogFormat "%h %l %u %t \"%!414r\" %>s %b \"%{Referer}i\" \"%{User-Agent}i\"" combined
・・・
・・・
#
# If you prefer a logfile with access, agent, and referer information
# (Combined Logfile Format) you can use the following directive.
#
SetEnvIf Request_URI "default\.ida" no_log
SetEnvIf Request_URI "cmd\.exe" no_log
SetEnvIf Request_URI "root\.exe" no_log
SetEnvIf Request_URI "Admin\.dll" no_log
SetEnvIf Request_URI "NULL\.IDA" no_log
SetEnvIf Remote_Addr 127.0.0.1 no_log
CustomLog "logs/access_log" combined env=!no_log
</IfModule>
・・・
・・・
#AddHandler cgi-script .cgi .pl
・・・
・・・
# Some examples:
#ErrorDocument 500 "The server made a boo boo."
#ErrorDocument 404 /missing.html
#ErrorDocument 404 "/cgi-bin/missing_handler.pl"
#ErrorDocument 402 http://www.example.com/subscription_info.html
#
ErrorDocument 403 /error/403.shtml
ErrorDocument 404 /error/404.shtml
以下を最終行へ追加。
ServerTokens Prod
TraceEnable off
autoindex 設定ファイル編集。
~]# vi /etc/httpd/conf.d/autoindex.conf
削除。
<Directory "/usr/share/httpd/icons">
Options Indexes MultiViews FollowSymlinks
AllowOverride None
Require all granted
</Directory>
テストページ削除。
~]# rm -f /etc/httpd/conf.d/welcome.conf
Perl コマンドへ /usr/local/bin/perl でもアクセスできるようにする。
~]# ln -s /usr/bin/perl /usr/local/bin/perl
Perl のパスを確認。
~]# whereis perl
Apache 自動起動有効+起動。
~]# systemctl enable --now httpd
ポート開放。
~]# firewall-cmd --add-service=http --zone=public --permanent
~]# firewall-cmd --reload
Web コンテンツ編集ユーザは、インストール時に作成したユーザとしています。(例:himari)
ドキュメントルート所有者を変更する。
~]# chown himari: /var/www/html/
himari で SSH 鍵方式ログイン出来るようにする。
himari にスイッチする。
~]# su - himari
~]$ mkdir ~/.ssh
~]$ chmod 700 ~/.ssh
公開鍵の中身を authorized_keys にコピペして保存。
~]$ vi ~/.ssh/authorized_keys
~]$ chmod 600 ~/.ssh/authorized_keys
~]# vi /etc/php.ini
変更と削除と追加。
short_open_tag = Off
↓↓↓
short_open_tag = On
output_buffering = 4096
↓↓↓
output_buffering = Off
display_errors = Off
↓↓↓
display_errors = On
;date.timezone = Asia/Tokyo
;mbstring.language = Japanese
;mbstring.internal_encoding = UTF-8
;mbstring.http_input = UTF-8
;mbstring.http_output = UTF-8
;mbstring.encoding_translation = Off
↓↓↓
mbstring.encoding_translation = On
;mbstring.detect_order = auto
;mbstring.substitute_character = none
↓↓↓
mbstring.substitute_character = "?"
拡張子が php のファイルも httpd.conf の ErrorDocument で指定したオリジナルのエラーページが表示されるようにする。
~]# vi /etc/httpd/conf.d/php.conf
追加。
<IfModule !mod_php.c>
# Enable http authorization headers
SetEnvIfNoCase ^Authorization$ "(.+)" HTTP_AUTHORIZATION=$1
<FilesMatch \.(php|phar)$>
SetHandler "proxy:unix:/run/php-fpm/www.sock|fcgi://localhost"
</FilesMatch>
ProxyErrorOverride on
</IfModule>
php-fpm 再起動。
~]# systemctl restart php-fpm
ImageMagick をインストール。
~]# dnf --enablerepo=epel install ImageMagick ImageMagick-devel
僕は WebP への変換で cwebp, gif2webp, webpmux を使っているので、libwebp-tools をインストール。
~]# dnf --enablerepo=crb install libwebp-tools
確認。
~]# magick --version
~]# cwebp -version
~]# gif2webp -version
~]# webpmux -version
必要なパッケージをインストール。
~]# dnf install php-devel php-pear
pecl で imagick をインストール。
Enter
~]# pecl install imagick
・・・
・・・
Please provide the prefix of ImageMagick installation [autodetect] : ⏎
・・・
・・・
You should add "extension=imagick.so" to php.ini
php.ini 最下部に追記。
~]# vi /etc/php.ini
・・・
・・・
extension=imagick.so
反映。
~]# systemctl restart php-fpm
RPM Fusion Free, Nonfree リポジトリを追加する。
~]# dnf install https://mirrors.rpmfusion.org/free/el/rpmfusion-free-release-10.noarch.rpm
~]# dnf install https://mirrors.rpmfusion.org/nonfree/el/rpmfusion-nonfree-release-10.noarch.rpm
FFmpeg をインストールする。(依存関係として EPEL が必要)
~]# dnf --enablerepo=epel install ffmpeg ffmpeg-devel
インストール確認。
~]# ffmpeg -version
新サーバーに Certbot クライアントをインストールします。参考:Certbot Instructions
まず、snapd をインストールし、自動起動有効+起動。
~]# dnf --enablerepo=epel install snapd
~]# systemctl enable --now snapd.socket
シンボリックリンクを作成。
~]# ln -s /var/lib/snapd/snap /snap
snap のパスが正しく更新されるようにするには、一度ログアウトして再度ログインするか、システムを再起動してください。
certbot をインストール。
~]# snap install --classic certbot
下記エラーが出たら、数分待ってから再度実行する。
error: too early for operation, device not yet seeded or device model not acknowledged
シンボリックリンクを作成。
~]# ln -s /snap/bin/certbot /usr/local/bin/certbot
Certbot を DNS-01 モードで実行。
~]# certbot certonly --manual --preferred-challenges dns -d wave440.com -d '*.wave440.com'
Enter
Saving debug log to /var/log/letsencrypt/letsencrypt.log
Requesting a certificate for wave440.com and *.wave440.com
- - - - - - - - - - - - - - - - - - - - - - - - - - - - - - - - - - - - - - - -
Please deploy a DNS TXT record under the name:
_acme-challenge.wave440.com.
with the following value:
abc123
- - - - - - - - - - - - - - - - - - - - - - - - - - - - - - - - - - - - - - - -
Press Enter to Continue ⏎
- - - - - - - - - - - - - - - - - - - - - - - - - - - - - - - - - - - - - - - -
Please deploy a DNS TXT record under the name:
_acme-challenge.wave440.com.
with the following value:
xyz789
(This must be set up in addition to the previous challenges; do not remove,
replace, or undo the previous challenge tasks yet. Note that you might be
asked to create multiple distinct TXT records with the same name. This is
permitted by DNS standards.)
Before continuing, verify the TXT record has been deployed. Depending on the DNS
provider, this may take some time, from a few seconds to multiple minutes. You can
check if it has finished deploying with aid of online tools, such as the Google
Admin Toolbox: https://toolbox.googleapps.com/apps/dig/#TXT/_acme-challenge.wave440.com.
Look for one or more bolded line(s) below the line ';ANSWER'. It should show the
value(s) you've just added.
- - - - - - - - - - - - - - - - - - - - - - - - - - - - - - - - - - - - - - - -
Press Enter to Continue ← ※
※「Before continuing, verify the TXT record has been deployed.」のあとの「Press Enter to Continue」ではすぐに Enter せずに下記を行います。
-d wave440.com と -d '*.wave440.com' の 2 つのドメインに対してそれぞれ別の CERTBOT_VALIDATION が発行されるため TXT は2つ表示されています。
旧サーバーの DNS に TXT レコードを追加。(Serial も変更する)
~]# vi /var/named/wave440.com.db.wan
_acme-challenge.wave440.com. 60 IN TXT "abc123"
_acme-challenge.wave440.com. 60 IN TXT "xyz789"
反映。
~]# rndc reload wave440.com
数分待って(5分ぐらい?)反映されたか確認。(TXT が返ってくれば成功)
~]# dig TXT _acme-challenge.wave440.com @8.8.8.8 +short
反映が確認できたら ※ の Enter を行う。
Successfully received certificate.
Certificate is saved at: /etc/letsencrypt/live/wave440.com/fullchain.pem
Key is saved at: /etc/letsencrypt/live/wave440.com/privkey.pem
mod_ssl インストール。
~]# dnf -y install mod_ssl
SSL 設定ファイル編集。
~]# vi /etc/httpd/conf.d/ssl.conf
変更と追加。
<VirtualHost _default_:443>
Protocols h2 http/1.1
・・・
・・・
# Use separate log files for the SSL virtual host; note that LogLevel
# is not inherited from httpd.conf.
ErrorLog logs/ssl_error_log
↓↓↓
ErrorLog logs/error_log
TransferLog logs/ssl_access_log
↓↓↓
CustomLog logs/access_log combined env=!no_log
LogLevel warn
・・・
・・・
#SSLProtocol all -SSLv3
#SSLProxyProtocol all -SSLv3
SSLProtocol TLSv1.2 TLSv1.3
SSLProxyProtocol TLSv1.2 TLSv1.3
・・・
・・・
SSLHonorCipherOrder on
・・・
・・・
SSLCipherSuite PROFILE=SYSTEM
↓↓↓
SSLCipherSuite HIGH:!aNULL:!MD5:!3DES:!CAMELLIA:!AESCCM:!ECDSA
・・・
・・・
SSLCertificateFile /etc/pki/tls/certs/localhost.crt
↓↓↓
SSLCertificateFile /etc/letsencrypt/live/wave440.com/fullchain.pem
・・・
・・・
SSLCertificateKeyFile /etc/pki/tls/private/localhost.key
↓↓↓
SSLCertificateKeyFile /etc/letsencrypt/live/wave440.com/privkey.pem
・・・
・・・
Header always set Strict-Transport-Security "max-age=15768000"
</VirtualHost>
Apache 設定反映。
~]# systemctl reload httpd
ポート開放。
~]# firewall-cmd --add-service=https --zone=public --permanent
~]# firewall-cmd --reload
Postfix 設定ファイル編集。
~]# vi /etc/postfix/main.cf
変更と削除と追加。
#myhostname = host.domain.tld
#myhostname = virtual.domain.tld
myhostname = mail.wave440.com
・・・
・・・
#mydomain = domain.tld
mydomain = wave440.com
・・・
・・・
#myorigin = $myhostname
#myorigin = $mydomain
myorigin = $mydomain
・・・
・・・
#inet_interfaces = all
#inet_interfaces = $myhostname
#inet_interfaces = $myhostname, localhost
inet_interfaces = localhost
↓↓↓
inet_interfaces = all
・・・
・・・
mydestination = $myhostname, localhost.$mydomain, localhost
↓↓↓
mydestination = $myhostname, localhost.$mydomain, localhost, $mydomain
#mydestination = $myhostname, localhost.$mydomain, localhost, $mydomain
#mydestination = $myhostname, localhost.$mydomain, localhost, $mydomain,
# mail.$mydomain, www.$mydomain, ftp.$mydomain
・・・
・・・
#home_mailbox = Mailbox
#home_mailbox = Maildir/
home_mailbox = Maildir/
・・・
・・・
#smtpd_banner = $myhostname ESMTP $mail_name
#smtpd_banner = $myhostname ESMTP $mail_name ($mail_version)
smtpd_banner = $myhostname ESMTP unknown
・・・
・・・
#smtpd_tls_cert_file = /etc/pki/tls/certs/postfix.pem
・・・
・・・
#smtpd_tls_key_file = /etc/pki/tls/private/postfix.key
以下を最終行へ追加。
smtpd_sasl_auth_enable = yes
smtpd_recipient_restrictions =
permit_mynetworks
permit_sasl_authenticated
reject_unauth_destination
message_size_limit = 10485760
smtpd_tls_security_level = may
smtp_tls_security_level = may
smtpd_tls_mandatory_protocols = !SSLv2,!SSLv3,!TLSv1,!TLSv1.1
smtp_tls_mandatory_protocols = !SSLv2,!SSLv3,!TLSv1,!TLSv1.1
smtpd_tls_cert_file = /etc/letsencrypt/live/wave440.com/fullchain.pem
smtpd_tls_key_file = /etc/letsencrypt/live/wave440.com/privkey.pem
smtpd_tls_session_cache_database = btree:/var/lib/postfix/smtpd_scache
master.cf 編集。
~]# vi /etc/postfix/master.cf
削除。
#submission inet n - n - - smtpd
# -o syslog_name=postfix/submission
# -o smtpd_tls_security_level=encrypt
# -o smtpd_sasl_auth_enable=yes
・・・
・・・
#submissions inet n - n - - smtpd
# -o syslog_name=postfix/submissions
# -o smtpd_tls_wrappermode=yes
# -o smtpd_sasl_auth_enable=yes
cyrus-sasl インストール。
~]# dnf -y install cyrus-sasl
自動起動有効+起動。
~]# systemctl enable --now saslauthd
新規ユーザー追加時に自動でホームディレクトリに Maildir 形式のメールボックスが作成されるようにする。
~]# mkdir -p /etc/skel/Maildir/{new,cur,tmp}
~]# chmod -R 700 /etc/skel/Maildir/
存在しないユーザー宛メールの破棄。
~]# vi /etc/postfix/main.cf
以下を最終行へ追加。
local_recipient_maps =
luser_relay = unknown_user@localhost
unknown_user 宛メールを破棄。
~]# echo unknown_user: /dev/null >> /etc/aliases
/etc/aliases 変更反映。
~]# newaliases
Postfix 再起動。
~]# systemctl restart postfix
ポート開放。
~]# firewall-cmd --add-port=25/tcp --zone=public --permanent
~]# firewall-cmd --add-port=587/tcp --zone=public --permanent
~]# firewall-cmd --reload
Dovecot インストール。
~]# dnf -y install dovecot
10-mail.conf 編集。
~]# vi /etc/dovecot/conf.d/10-mail.conf
追加。
#mail_location =
mail_location = maildir:~/Maildir
10-auth.conf 編集。
~]# vi /etc/dovecot/conf.d/10-auth.conf
追加。
#disable_plaintext_auth = yes
disable_plaintext_auth = no
10-ssl.conf 編集。
~]# vi /etc/dovecot/conf.d/10-ssl.conf
変更。
ssl_cert = </etc/pki/dovecot/certs/dovecot.pem
↓↓↓
ssl_cert = </etc/letsencrypt/live/wave440.com/fullchain.pem
ssl_key = </etc/pki/dovecot/private/dovecot.pem
↓↓↓
ssl_key = </etc/letsencrypt/live/wave440.com/privkey.pem
Dovecot 自動起動有効+起動。
~]# systemctl enable --now dovecot
ポート開放。
~]# firewall-cmd --add-port=995/tcp --zone=public --permanent
~]# firewall-cmd --reload
SSH によるリモート接続はできないメールユーザ(例:rin)を作成。
~]# useradd -s /sbin/nologin rin
~]# passwd rin
【受信】
受信は自動転送にしています。
「root 宛てメールの転送」の要領で。
アカウント名(例:player)を Gmail へ転送。
~]# vi /etc/aliases
追加。
player: tensousaki@gmail.com
設定反映。
~]# newaliases
【送信】
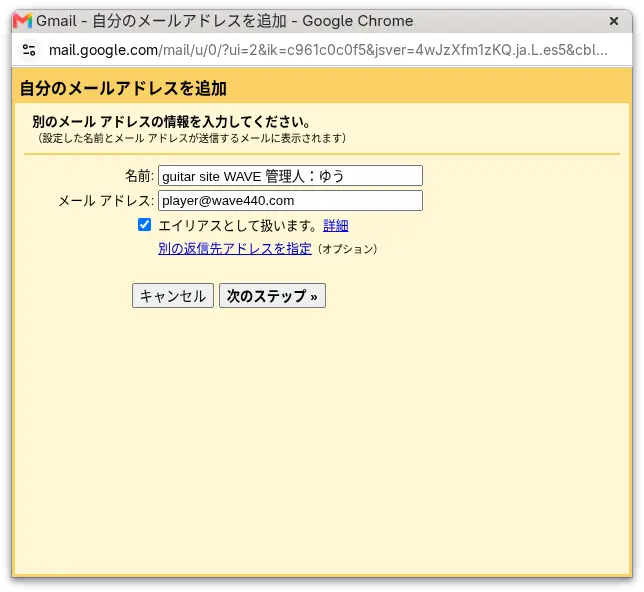
歯車アイコンの設定→すべての設定を表示→アカウントとインポート→他のメールアドレスを追加
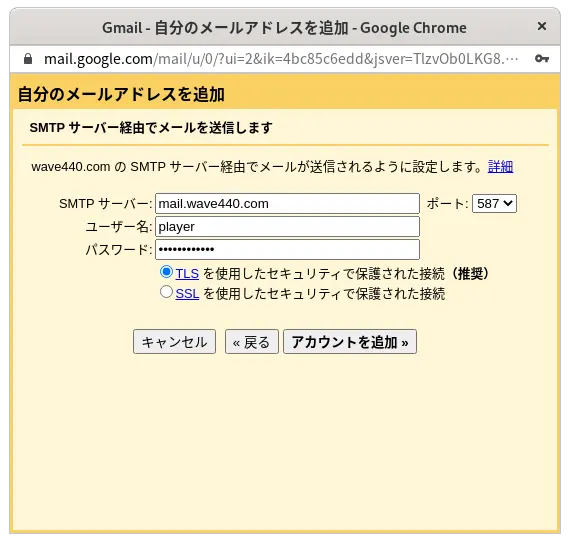
ポートは、587,TLS 使用を選択。
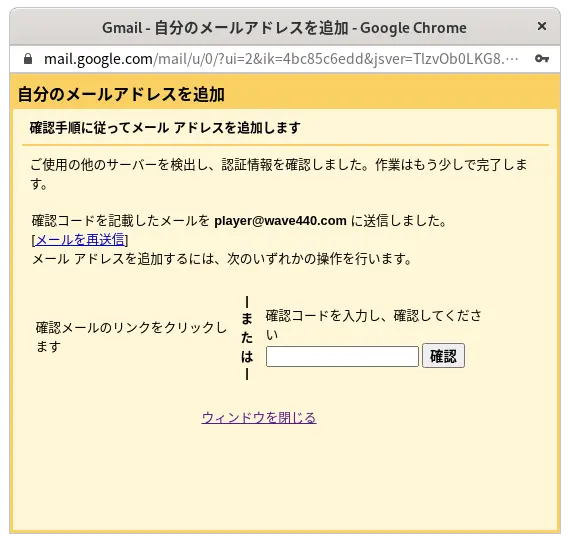
以下の記載内容を実行する。